
Ramps are some of the most common accessible home modifications requested. They support a variety of people with disabilities including those who utilize wheelchairs as a means of functional mobility as well as users who require a ramp to support their temporary recovery from elective hip and knee surgeries to individuals who are looking to modify their homes for aging in place.
Because installation of ramps is common, they seem simple to most people. Friends, family, or even volunteer church groups often install ramps with the kindest and most sincere intentions. However, often those ramps are too steep, or lack other elements necessary for safe, comfortable use.
Ramps are one of the most common areas where we need to step in as home modification experts to correct. It is also a common home modification request to install for many clients. Thrive for Life’s comprehensive home modification process involves seven phases.
Phase 1: Processing New Referral
We met a client who was a teenager living in a rental home with her family. The client was using a wheelchair and wanted to avoid having her mom be forced to push her up a ramp. She wanted to be able to maneuver herself as independently as possible into and out of the house.
At this phase, we gather as much information as we can, including the client’s medical history, the primary stated problem, and obtain the home address and phone number of our prospective client. Then we coordinate a site visit when all family members can be present to discuss the needs.
When the client is in a rental, it is necessary to ask the landlord for permission to make any home modifications. Under the Fair Housing Act, landlords are barred from refusing to allow home modifications. However, landlords (the homeowners) do not have to pay for the home modifications requested and they are allowed to request that the home be returned in the condition in which it was rented after our client moves out. That means that any modifications installed by the renter must be paid for by the renter and removed (at the renter’s expense) when the renter leaves.
If it happens that the landlord balks on allowing necessary home modifications, we take that responsibility as the home modification consultant to have that conversation with the landlord to inform them of the law. Sometimes the home modification actually increases the value of the home, we ask that the landlord allow for the modification (paid for by the renter) but also agree in writing that they will not require the renter to put the space back the way it was when they move out. We facilitate these tough conversations so our clients do not have to.
Phase 2: Assessment
In our assessment phase, we conduct a comprehensive evaluation. We seek to understand the medical diagnosis of the client and the client’s daily needs and activities, along with the client’s caregiver abilities as well as the existing home environment. At the conclusion of the assessment, we provide a range of solutions, from small scale to large scale, that could meet the client’s needs.
Because in this case, the client did not own the home, we needed to know how long the client and her family intended to remain in the house. Length of stay can factor into the scope of the solution we implement. If the client does not plan to stay in the home for the foreseeable future, it may not be feasible to implement a large-scale, permanent, and potentially expensive solution.
As part of our comprehensive assessment, we checked the client’s home entryways as well as other elements that affect daily function, such as bathrooms and bedrooms. We always try to offer suggestions and solutions that make our clients’ lives easier and more comfortable throughout their homes.
We checked the primary entrance to the home, which consisted of three steps, a landing, and then a 90-degree turn into the house. There are a variety of ways to address this issue, besides ramps. 

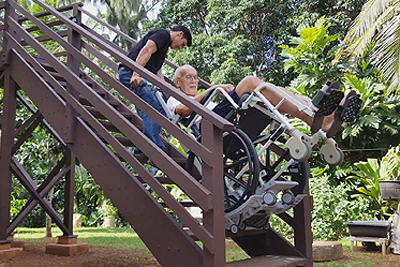
One option that we presented to the client was a stair climber. Stair climbers are basically motorized dollies that the chair can attach to in order to be lifted up the stairs. They can be less expensive than constructing a ramp, and since they do not change the exterior of the home nor are they permanent, they may be a better option when landlords are involved.
In some cases, stair climbers are also preferable to ramps because they do the lifting work, rather than the client or caregiver maneuvering the chair up a ramp. They do require some sequencing and effort by the caregiver to physically attach the chair to the climber. As helpful as they are, they do not require or allow for independence.

We brought out a stair climber for a trial run. The caregiver (mom) could manage maneuvering the client (her daughter) into the stair climber. However, the daughter wanted to be as independent as possible. She didn’t want to have to rely on her mother to move her from her chair to the stair climber; she had appropriate upper-body strength to support independent use of a wheelchair up and down a ramp; so we decided that a ramp was the most appropriate option.
We had a conversation with the landlord, who had no objections to this project. The family agreed to remove the ramp should they move out per the landlord’s request.
Phase 3: Design
In our design phase, we schedule draftsman for a site visit to evaluate and draw up initial permit ready plans. If necessary, we draft a Letter of Medical Necessity to expedite permits and secure physician signatures needed. When the plans are completed, we review them with the client/landlord and follow up with the insurance company or financially responsible party.
We had the draftsman come in to measure the property, pull public records, and do some drawings of the home to see what was feasible. An important question to ask is: Does this property allow room to install a ramp to ADA guidelines?
Does she require a ramp that is designed to ADA guidelines? According to ADA Guidelines, for every one inch of rise, a ramp needs 12 inches of run (or length of ramp). In the residential setting, home modifications do not have to follow ADA guidelines. Slope can be more closely related to what the client can manage, if they have good upper-body strength a ramp can be steeper. If they have a diagnosis that results in a degenerative process a ADA or longer ramp may be more appropriate. Discuss this with your client and their caregivers!
We suggested that our client go out into the community to try out an ADA-approved ramp (at the post office, airport, and so on) to see if she can manage to roll herself up that degree of incline, or if she could even manage a steeper incline.
When considering the factors of cost and length of stay in the home as well as the daughter’s desire for independence, we ended up choosing a pre-fabricated, portable ramp that can be removed when they move out of that home. We were able to choose it with an incline that she could handle, given her tests out in the community.
Phase 4: Permits
We are informed by the draftsman about any permits we need to secure before beginning construction, but you should also get to know the building codes in your location. Knowing these sometimes-complicated rules and regulations is part of the value we bring to home modification clients! Permit requirements vary by state, city, or county, so please get to know what is required in your area. It is important to be vigilant about this step. Once we get any necessary permits, we can begin installation.
Phase 5: Contractor Bids
Cost is a foundational factor in a client’s ability to complete a home modification project. It is important to secure several contractor bids for completing the project for comparison. If the project is being paid for by a medical insurance company, they often require a certain number of bids.
This is easy if the home modifications expert already has a good relationship with a number of quality contractors, like we do. If not, it is important to begin vetting contractors. This involves investigating the contractor’s references, online reviews and references, Better Business Bureau complaints, as well as confirming the contractor’s license and insurance.
Receiving accurate bids from contractors involves site visits so that they can see the environment for themselves, take measurements, and make notes. To avoid any change orders or other surprises later, it is important to be as detailed as possible with the contractor about the requirements of the project within your scope of work that the contractor uses to complete their estimate.
We personally meet with each contractor on site to discuss the project with them and answer any questions they have. We communicate clearly with the contractor about any specific client requirements, hours they can be on site, time required for the project and expected date of completion.
Phase 6: Construction
In the construction phase, we continue our efforts at clear communication. We often post large drawings on the wall at the project site to ensure that the scope of work, drawings, permits and expectations are clear. We conduct weekly site visits to monitor progress and take photos of the work.
We take several steps to make sure that our clients are comfortable during the construction process. Before construction, we discuss issues such as bathrooms. If the client has only one bathroom or if they are not comfortable with sharing their bathroom with the construction workers, we install a portable toilet on site. If the site will generate a large amount of dust or debris, we place air purifiers in the home. It is also important to make sure, especially in the case of work on entryways, that the client has a safe and secure way to get out of the house in case of emergency.
In this case, because it was a prefabricated ramp, installation happened outside the home and only took about half a day to complete.
As the project is completed, we make sure that the construction crew cleans up after themselves, leaving nothing on site.
At the end of the project, we make sure that they are comfortable and safe using whatever has been installed and that it provides what it was supposed to for them. We have clients demonstrate using the modifications to ensure their safety and the success of the project.
Our client was thrilled with the installed ramp, and was able to use it immediately independently!.
We leave any instruction manuals and warranty paperwork with clients so they know who to contact in the event of a product issue.
Phase 7: Post-Occupancy Evaluation
After we inspect the finished project, we check back in with the client about a week later to see how everything is working out. We also check in with the caregiver, the homeowner, and the person or company paying for the project.
We leave our phone numbers with the client and the financially responsible party so that they can call us with any concerns or issues as they arise.
If you are looking for home modifications, it pays to do your research and make sure that the modifications company has experience both in working with contractors and in supporting individuals with medical needs like your own.
Reach out to us and can discuss how Thrive for Life can support you!